

Need to change a broken guitar string or replace a whole set? Let us be your guide …
Whether one or all of your strings needs replacing, this article aims to give you the confidence to change strings proficiently on any electric guitar. Changing strings can make your Gibson play better, improve tuning stability, and refresh its tone.
How Often Should You Change Guitar Strings?
It’s often recommended that users replace their strings every three months or 100 hours of playing. This will vary from player to player, as different players will wear their guitars differently (i.e., are you using picks, how much do you sweat, are you playing shows, did you eat greasy fries while practicing, etc.). The best thing to do is to check your strings once a week and see if there is a significant increase in wear from the last time you checked them. You’ll want to look for corrosion and frayed strings. Even if you see a bit of wear, we recommend replacing the strings as soon as possible to improve your guitar’s tone and feel.
Here are the supplies we recommend you have on hand to change strings:
- A solid flat surface you can lay your guitar on as you work on it
- A stand or pillow to rest your guitar neck on
- Your package of new strings (or single string if applicable)
- A polishing cloth
- Wire cutters
- Eye protection (safety goggles, glasses, plastic face shields, etc.)
- String winder (manual or electric does the trick)
- [Optional] Blue masking tape (if you are removing all strings)
Step 1: Loosen the Strings
Start by setting your guitar on the flat surface you plan to work on. Make sure the stand/pillow is placed underneath the neck of your guitar so that you elevate the headstock from your work surface. Having a proper work surface will be important as you change strings because many of the steps will require two hands, and you’ll need your guitar to remain still (and safe from heartbreaking mishaps!).
Step 2: Clip and remove your strings
Safety Tip: Before clipping the currently installed strings, always make sure you loosen whichever strings you plan to remove first. Clipping the strings at full tension could cause flesh wounds or damage to the guitar body. Remember, it’s all fun and games until somebody loses an eye!
For replacement of a single string:
Use the wire cutter to clip the string above the guitar’s pickup. From there, lay the long end of the string off to the side while threading the smaller remainder of the wire out of the tailpiece (FYI, some recycler-minded people make crafts and jewelry with old strings, and also the ball ends). When threading the strings out of the tailpiece, it’s helpful to position a polishing cloth on the guitar’s body to avoid scratching your finish. Once you’ve removed the shorter end, you can remove the polishing cloth from the bottom of the tailpiece. Then take the longer end of the string and unravel it from the tuner.
For replacement of all strings:
For each string, follow the procedure for clipping and removing the strings mentioned above. Please note that if you change strings all at once, the bridge no longer has tension holding down on the bridge posts, nor is anything holding the tailpiece in place, either, so we recommend applying some blue masking tape to each side of the bridge and the tailpiece when replacing all strings. This helps to ensure that your hardware doesn’t fall off and possibly scratch your instrument. If you don’t have any blue masking tape, you can replace half of the strings simultaneously (replace three while three remain attached to the bridge and tailpiece). Applying this half-removal method achieves the same goal as using blue masking tape.
Step 3: Install New Strings
For replacement of a single string:
Simply thread the new string through the tailpiece so the ball end is securely in place and the bare wire end sits at the top of the headstock.
For replacement of all strings:
We recommend removing the tailpiece from the guitar. From there, thread all the strings into their respective holes in the tailpiece (with the balls set in the tailpiece). All Gibson string kits have labels, so you can easily tell which strings belong where. You can then re-attach the tailpiece to the guitar and lay the bare wire ends of all strings to the top of the headstock.
Step 4: Re-string the Headstock
There are two methods you can use to restring your headstock:
Simple Method:
- Hold the new string taut, and cut it so there are about 2.5 to 3 inches of extra string beyond the tuning post.
- Set your tuner hole perpendicular to the center line of the neck. Then thread the string into the hole from the center of the headstock going outward, leaving about 1/16”-1/8” sticking out of the end of the tuning post hole.
- Put a small bend in the string where it entered the tuning post hole, and use a guitar string winder to wind the tuning knob.
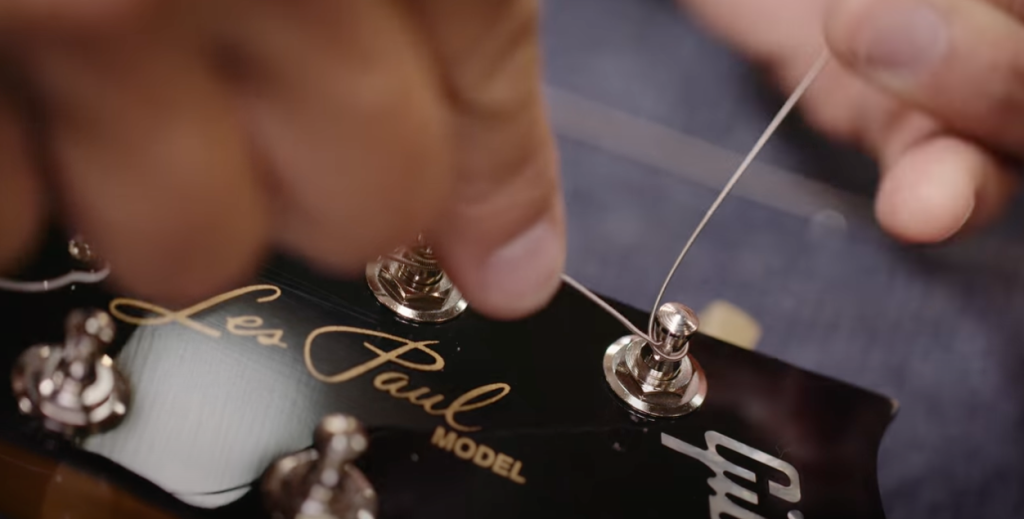
- Apply downward pressure on the string as you tighten it. This will ensure that successive wraps are below the previous one. Having multiple windings overlapping in a criss-cross fashion will cause instability when tuning because there’s a greater chance the windings will shift around. You want a uniform pattern.

Master Luthier Jim DeCola winds the string through the tuning post while applying downward pressure on the string
Z-Wrap Method:
- Set your tuner hole perpendicular to the center line of the neck. Then thread the new strings into the hole (from the center of the stock going outward). Unlike the simple method, you do not need to trim the string yet.
- Thread your wire into the tuning post hole, leaving about 1 inch of slack on the string. Then bend both ends of the string around the tuning post in a clockwise pattern. This should form a Z bend around the tuning post.
- Apply downward pressure on the string as you tighten it. This will ensure that successive wraps are below the previous wrap. Having multiple strings criss-crossing over one another will cause instability when tuning.
- Finally, snip the excess string off the end with a wire cutter.
Master Luthier Jim DeCola shows how to lock the Z bend
Step 5: Stretch the Strings
Once you have finished changing the strings, the last step is to stretch them. Stretching strings allows for more stable tuning. Placing the string in between your thumb and index finger, pull upward on the string and run your hand up and down the full length. When stretching the strings, hold them so the string can slip out (to avoid any potential injuries to your hands). Stretch it a bit and tune it up. Rinse and repeat until the string remains stable in pitch.
And congratulations, you’ve now finished changing strings for your electric guitar. For more details on this process, check out our in-depth video with Master Luthier Jim DeCola.
Want Some More Help?
If you have more questions or would like further advice from a live professional, schedule an appointment with one of our Virtual Guitar Techs. They offer free, one-on-one, online video consultations on anything that you might need regarding your Gibson Family of Brands instruments.
